

Quickly see and review the Status of ActiveCampaign marketing emails along with their Lead Scores from your SugarAI. The SugarActiveCampaign add-on helps users effectively reach contacts via marketing efforts from ActiveCampaign and view them in Account, Leads, Contacts and Target List modules on SugarAI side. It supports on-premise deployments.
Installation Guide
Before you start
- SugarAI 12.x, 13.x, 14.x, 25.x or 26.x: Professional, Corporate, Enterprise or Ultimate.
- A SugarAI administrator account to install and set up the add-on.
- An ActiveCampaign account with API access, and at least one list.
- SugarAI's cron (scheduler) running, for syncing existing records and lead scores.
- For campaign activity in SugarAI: your SugarAI site must be reachable from the internet over HTTPS, so that ActiveCampaign can send it updates.
- A license key for the add-on.
Setup takes about 10 minutes and is done once by a SugarAI administrator.
1. Install the add-on
- In SugarAI, open Admin > Module Loader.
- Click Choose File, select Sugar_ActiveCampaigns_v3.2.8.zip and click Upload (1).
- Click Install next to the uploaded package, accept the license and finish the installation.
When the installation is finished, the package is listed as Sugar_ActiveCampaigns v3.2.8 (2).
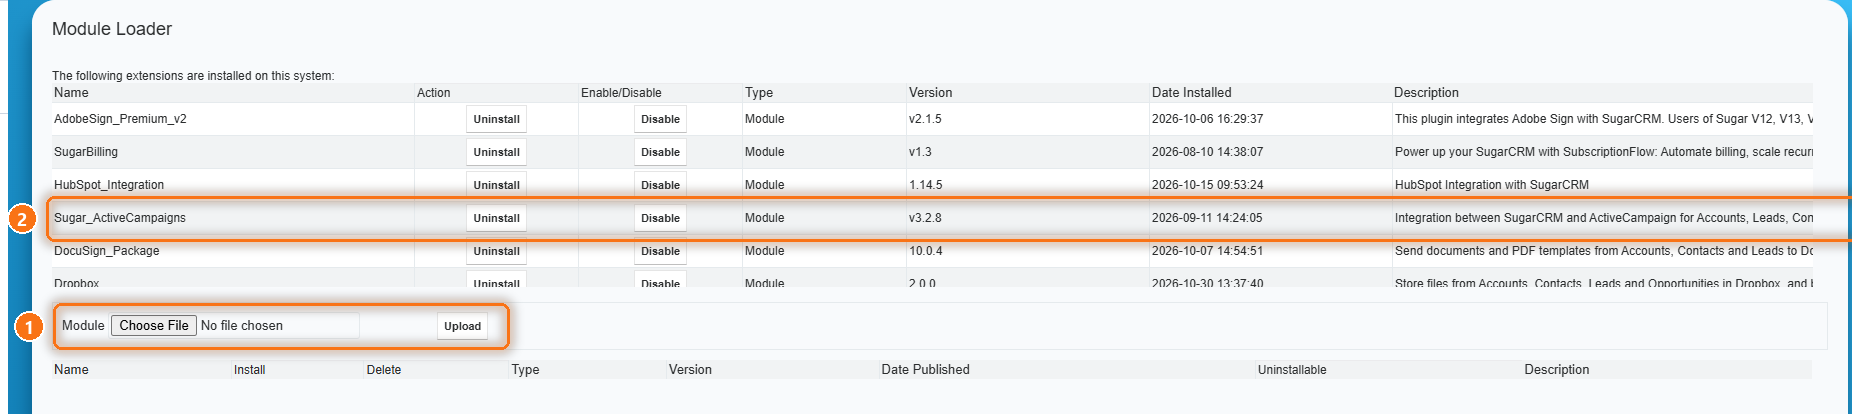
The installation:
- creates the ActiveCampaigns module, which stores campaign activity;
- adds an ActiveCampaigns subpanel to Accounts, Contacts and Leads;
- adds an AC Lead Score field to Accounts, Contacts and Leads;
- adds the scheduler jobs used to sync existing records and lead scores.
The Admin page now has an ActiveCampaign Configuration section with License Validation and ActiveCampaign Api Configuration.

2. Activate your license
- Go to Admin, and under ActiveCampaign Configuration click License Validation.
- Paste your license key (1) and click Validate (2).
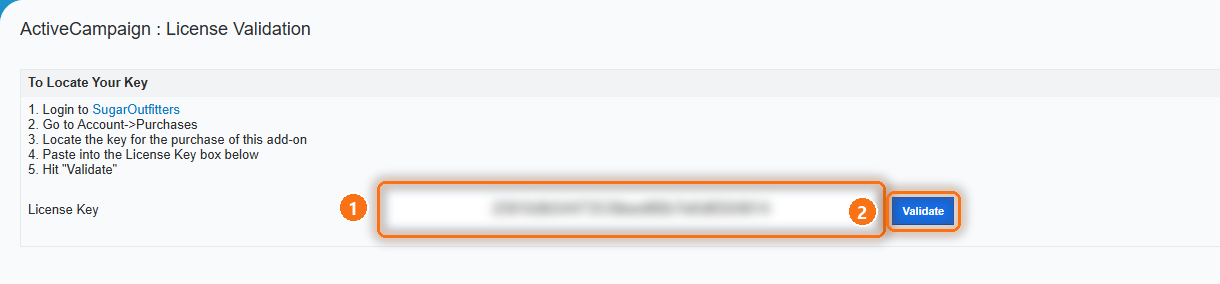
You can find your key in your SugarOutfitters account under Purchases. Until the license is validated, the configuration screen sends you back to this page.
3. Connect to ActiveCampaign
Go to Admin, and under ActiveCampaign Configuration click ActiveCampaign Api Configuration. The badge next to the title shows whether SugarAI is connected. The other tabs stay locked until the connection works.
- In ActiveCampaign, open Settings > Developer and copy your API URL and API Key.
- On the Connection tab, paste the API URL (1), for example https://youraccount.api-us1.com
- Paste the API Key (2). Click Show to check what you pasted.
- Click Test Connection (3).
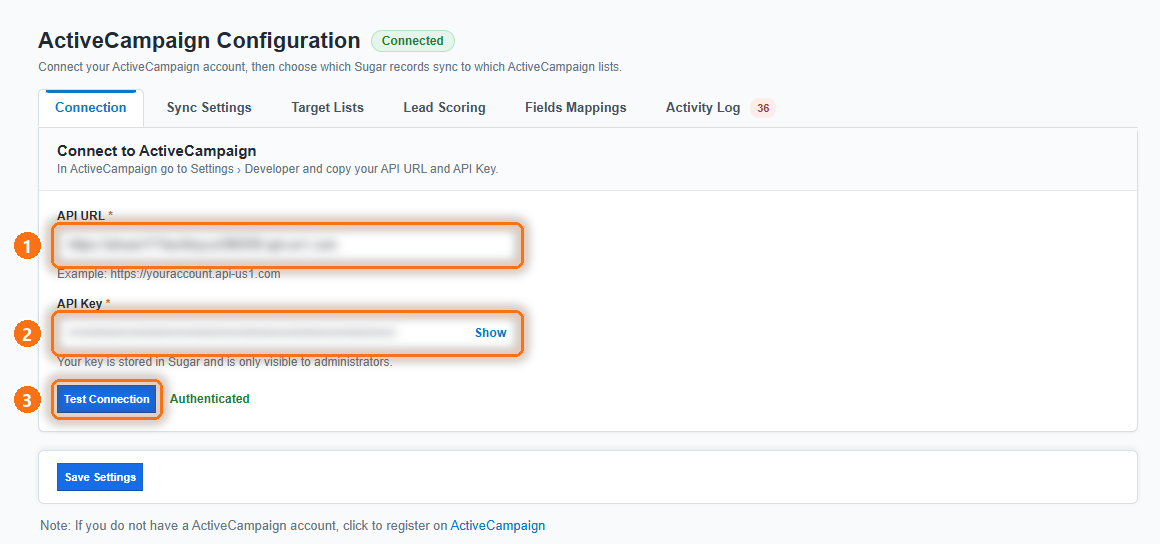
When the credentials are correct, you see Authenticated and the badge shows Connected. The API URL and API Key are saved at this point and are visible only to administrators.
Next, set up what is synced in the User Guide.
Upgrading
Before you upgrade, note your API URL, your list choices and your field mappings. Install 3.2.8 over the old version in Module Loader. Then open Admin > ActiveCampaign Api Configuration, click Test Connection, check each tab and click Save Settings. Records already synced are not sent again.
Uninstalling
In Admin > Module Loader, click Uninstall next to Sugar_ActiveCampaigns and choose whether to keep the campaign activity data. Uninstalling removes the saved settings and field mappings. Your contacts and lists in ActiveCampaign are not changed.
 Saving Comment...
